
How to Set up Custom Domain Name for Blogger Blogs
The internet has become a more open place to everyone. Anyone can share their skills, knowledge and ideas through various mediums such as Videos, podcast and obviously through blogging.
When it comes to blogging, you can start a free blog right today with BlogSpot blogging platform. Blogspot or Google Blogger is one of most popular blogging platforms in the world. If you want to learn step by step how to create a free BlogSpot blog, read this detailed post which guides you how to create a free blog and start optimizing it for real world.
Today, in this tutorial you will learn how to host Blogger on your own domain. In other words, set up the custom domain for Blogspot blogs. If you’re wondering why you should use a custom domain for your BlogSpot blog, Here are a few reasons.
Now you’re convinced that you should take a decision to have own domain name for your blog rather than usual yourblogname.blogspot.com. So, let’s start adding a custom domain name for your BlogSpot blog.
This guide on Integrating custom domain with BlogSpot have major three parts. All are very important in setting up the Blogspot custom domain. In this entire tutorial, you'd learn how to:
Are you ready to start adding a custom domain name for your BlogSpot blog? So, let’s start!
Actually, this is a crucial part of this tutorial. If you purchased a non-relevant domain for your blog, that could decrease your credibility, traffic and even waste your valuable time and efforts.
Choosing a domain name for your blog is easy. But here are a few tips to select a perfect top level domain (TLD) for your blog. Make sure you chose one of these three domain types as your need.
Now I think you have an idea what type of your BlogSpot custom domain should be. If you want to start a blog for your online business, you can use a short but very descriptive domain such as Social Media Examiner and Pro Blog Tricks.
If you want to build up your brand, you’d use your name as your domain. Ex: chamalpriyadarshana.com, Johnchow.com, neilpatel.com
Now it’s time to find the domain name availability. Use one of these free tools to check domain name availability. Don’t worry if your intended domain name for BlogSpot is not available. Be creative and craft a good top level domain name.
Once you have your own domain for BlogSpot blog, it’s time to register the domain name. In the real world, .com, .net and.org top level domains perform well on search engine result pages (SERPs). So if you want to buy a .com domain or even other top level domain, you’d use a top domain name register such as Godaddy.
Godaddy is the best domain name registrar in the world. Already millions of webmasters use Godaddy to host their doamins. If you want to buy a cheap domain for your Blogger blog, Use Godaddy.
Special Coupon: Purchase your .com domain only for $1.49 from this link

After purchasing your custom domain for Blogger blog, follow below instructions to integrate custom domain with BlogSpot.
The way we approach to mapping custom domain to work with Godaddy in Blogger is slightly different from setting custom domain for Tumblr. You need to verify your domain ownership to Google in a special way. So first of all, you need to get some special codes from Blogger. To get this;
#1. Login to your Blogger account from www.blogger.com. Choose the blog you want to set up the custom domain from blog list.
#2. Go to Settings >> Basic and then click the “+ Set up a 3rd Party URL for your blog” link under your blog address.

#3. Now enter your domain name including www (if you want to add a www subdomain in front of your domain)

#4. Click on “Save” button. You should get a red error message. Don’t worry, it’s normal and we want this!

If you don’t get this error message, follow these steps to get the token key for your Blogger custom domain.
#4. 01 Go to Google Webmasters verification page from here. (Note: If you didn't set up the Google webmaster account, you cannot follow this method. So learn how to verify your domain ownership to Google from this step by step tutorial)
#4. 02 Click on “Verification Details” link right of your custom URL.
#4. 03 At the top of page you can see how you attempted to verify your domain. Click on DNS CNAME record details to expand the record.

#4. 04 Now you would get a similar result like below. The portion of highlighted area is the “Host” part and the portion begins with “gv” is the “Point to” field. Save these details in a text document. You need them later in this tutorial.

Now you got the CNAME domain verification token key from Blogger. Let’s move to next step: mapping domain to work with Blogger.
#5. Log in to your Godaddy account manager.
#6. Click on “Launch” button next to Domains.

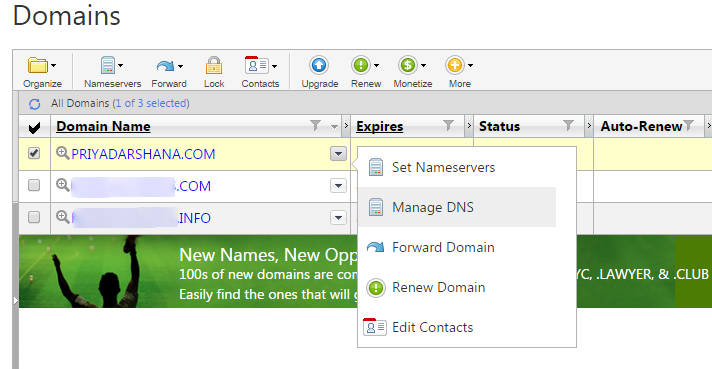
#7. Now you can see all your registered domains. Select the domain you want to add to Blogger and then click on the down-arrow button. Choose Manage DNS option from the menu list.
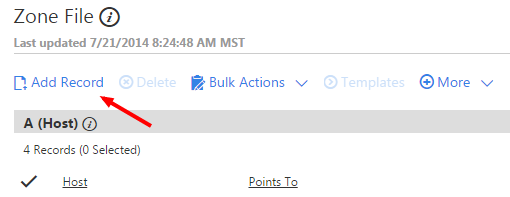
#8. You are in the Domain DNS zone. This is where you control the domain name, adding subdomains, linking to website hosts, etc. Now you want to verify your authority of domain name to Google.
Click on “Add Record” link in the Zone file section.
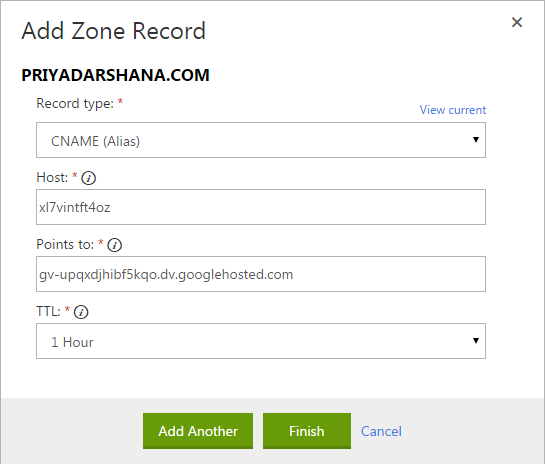
#9. Now you can see a pop out box titled “Add Zone Record”. Select record type as CNAME (Alias). Enter the values in the Host field and in the Point to field as shown below screenshot.
Note: You should copy and paste the values you received from Blogger in the 4th step. Don’t enter these values.
#10. Set TTL (Time To Live) as 1 hour. Then click on “Add Another” button. If you added the values correctly, you’d see a screen like below.

#11. Now you can close the pop up window. Don’t forget to save your changes.
#12. Now you have to point Google host to add www subdomain to your blog. Follow this step if you want include www in your domain. (Ex: www.priyadarshana.com) People who enter your blog URL as www.yourblogsite.com and try to view your blog will see a 404 page, if you don’t add www domain. So here’s how to add www part to your domain in Godaddy.
By default, Godaddy adds www subdomain pointing to the same host. So you just need to edit the Point to address. Here’s how to do it.
Click on Edit Record icon of www CNAME.

Remove “@” in the Point to field and enter ghs.google.com.
Host: www
Point to: ghs.google.com

Set TLL as 1 hour and click on finish button.
Don’t forget to save your changes.

#13. Now you verified your domain. But you didn’t point your domain to Google IPs. Here’s how to change the host IPs and set BlogSpot as the hosting provider in Godaddy.
#13. 01 Click on “Add Record” link.
#13.02 Select A (Host) Record from the record type list. Type @ to Host text field and in the Point to, enter this first Google IP: 216.239.32.21. Set TTL as one hour and then click on “Finish” button.

Now do the same thing for these three Google IPs and last save your changes in Godaddy Domain DNS zone.
216.239.34.21
216.239.36.21
216.239.38.21
After entering above four Google IPs, you’d see a screen like below.

#14. You don’t need the original host IP anymore. So you can delete it.
Now you configured custom domain at Godaddy for your BlogSpot blog. Remember it might take up to 48 hours to update the DNS zone. So wait a few hours and come back to your Blogger account.
For me, It took less than 5 minutes to map the custom domain to Blogger blog. If you followed the same process I explained above, you would also be able to set up the custom domain in less than 5 minutes.
Click on “Edit” link near to your custom domain in Blogger account and select the option that says to redirect your non-www domain to www domain.

Then click on “Save” button.

Question: I have a fear, whether my search engine ranks will drop by moving to a custom domain. Can I get my lost positions again?
Blogger uses permanently redirect method which is also known as “301 redirect”. So 90% of link juice and authority will pass to your new domain. However, it’s not guaranteed that your previous search positions will come again in an overnight as you have a new domain. It’s good to move to a custom domain as fast as you can.
Question: Should I change my blog posts and page permalinks within blog posts?
No, Blogger uses permanent redirect to redirect the traffic to new domain. It will also redirect traffic coming from old URLs.
Question: My new URL only works with/without “www”
Go back to Blogger Publishing section and click the edit link near to your blog custom URL. Check the check box which asks you to redirect traffic from non www URL to www URL.
Now you set up the custom domain for your BlogSpot blog. So Here are some important things to do for increasing the SEO performance of your blog.
Using a top level domain name for your BlogSpot blog not only gives the unique and professional look, but also after a few weeks, you could start seeing massive increases of your overall traffic stats. It’s not only because you publish engaging content that people want to read and follow, but also because you have built up the authority and expertise in your industry that people remember you as the owner of yourdomain.com website.
People will start addressing your Brand on social media, online communities, online-conferences and also search your brand/website on Google. That way without your concern, your custom domain will take your online business to a few levels.
Hope this tutorial helped you set up the custom domain name for your BlogSpot blog. If you have anything to ask, share or complain, please use below comment form.
When it comes to blogging, you can start a free blog right today with BlogSpot blogging platform. Blogspot or Google Blogger is one of most popular blogging platforms in the world. If you want to learn step by step how to create a free BlogSpot blog, read this detailed post which guides you how to create a free blog and start optimizing it for real world.
Today, in this tutorial you will learn how to host Blogger on your own domain. In other words, set up the custom domain for Blogspot blogs. If you’re wondering why you should use a custom domain for your BlogSpot blog, Here are a few reasons.
- Custom Domain Blogger gives your blog the uniqueness and the professional look.
- Increases the credibility and authority of your blog. Thus, many people prefer to click on your domain on SERP than another.blogspot.com blog.
- Exponentially Blogspot custom domain increases your brand.
- Take your Blogspot blog as another authoritative online business to the world.
- Many affiliate programs and advertising platforms such as BuySellAds accept Blogspot blogs with own domain rather than blogs with .blogspot.com sub-domain. (In the case of BuySellAds, they don’t accept blogs with free sub-domains)
- People like to share links with a custom domain than a blogspot.com domain. So you get more social exposure and eventually obtain more natural backlinks, co-citations and traffic.
Now you’re convinced that you should take a decision to have own domain name for your blog rather than usual yourblogname.blogspot.com. So, let’s start adding a custom domain name for your BlogSpot blog.
How to set up custom domain name for BlogSpot – step by step guide
This guide on Integrating custom domain with BlogSpot have major three parts. All are very important in setting up the Blogspot custom domain. In this entire tutorial, you'd learn how to:
- Choose a Domain and Buy Domain Name for Blogger blog
- Configure Custom Domain to Work with Blogger
- Redirect BlogSpot to Domain
Are you ready to start adding a custom domain name for your BlogSpot blog? So, let’s start!
Step #1. Choose a Domain Name and Buy Domain for Blogger blog
Actually, this is a crucial part of this tutorial. If you purchased a non-relevant domain for your blog, that could decrease your credibility, traffic and even waste your valuable time and efforts.
Choosing a domain name for your blog is easy. But here are a few tips to select a perfect top level domain (TLD) for your blog. Make sure you chose one of these three domain types as your need.
If you want a domain for your Branded blog:
- Select an easy to spell, enter and short domain name such as moz.com and labnol.org.
- Find whether anyone has already claimed your brand on social networks such as Twitter, Facebook etc.
- You have to start from A. So make sure you can commit your time and efforts for your blog.
If you want a domain for your small business blog:
- Try to include at least one of target keywords within your custom domain. Ex: premiumbloggertemplates.com, bloggingtips.com (Your target keyword would help in boosting rank for multiple long tail keywords, even though they are very competitive) you can find awesome keywords using the Google keyword planner.
- Make sure your domain name doesn’t exceed the 10-15 characters. It should be easy to spell and also be memorable.
If you want a domain for your micro-niche blog (niche-specific blog):
- Make sure it includes your target keyword(s). Ex: hostgatorcoupons2015.com
- It doesn't matter how much lengthy the domain name is. But, don't add extra words for top level domain. You can find good top level domain names for your niche/event blogs by using LongTail Pro niche software. Get a Long Tail Pro discount 2015 over here and learn more about Long Tail Pro through this comprehensive Long Tail Pro review.
Now I think you have an idea what type of your BlogSpot custom domain should be. If you want to start a blog for your online business, you can use a short but very descriptive domain such as Social Media Examiner and Pro Blog Tricks.
If you want to build up your brand, you’d use your name as your domain. Ex: chamalpriyadarshana.com, Johnchow.com, neilpatel.com
Now it’s time to find the domain name availability. Use one of these free tools to check domain name availability. Don’t worry if your intended domain name for BlogSpot is not available. Be creative and craft a good top level domain name.
Once you have your own domain for BlogSpot blog, it’s time to register the domain name. In the real world, .com, .net and.org top level domains perform well on search engine result pages (SERPs). So if you want to buy a .com domain or even other top level domain, you’d use a top domain name register such as Godaddy.
Godaddy is the best domain name registrar in the world. Already millions of webmasters use Godaddy to host their doamins. If you want to buy a cheap domain for your Blogger blog, Use Godaddy.
Special Coupon: Purchase your .com domain only for $1.49 from this link
After purchasing your custom domain for Blogger blog, follow below instructions to integrate custom domain with BlogSpot.
Step #2. Configure Custom Domain to Work with Blogger in Godaddy
The way we approach to mapping custom domain to work with Godaddy in Blogger is slightly different from setting custom domain for Tumblr. You need to verify your domain ownership to Google in a special way. So first of all, you need to get some special codes from Blogger. To get this;
#1. Login to your Blogger account from www.blogger.com. Choose the blog you want to set up the custom domain from blog list.
#2. Go to Settings >> Basic and then click the “+ Set up a 3rd Party URL for your blog” link under your blog address.
#3. Now enter your domain name including www (if you want to add a www subdomain in front of your domain)
#4. Click on “Save” button. You should get a red error message. Don’t worry, it’s normal and we want this!
If you don’t get this error message, follow these steps to get the token key for your Blogger custom domain.
#4. 01 Go to Google Webmasters verification page from here. (Note: If you didn't set up the Google webmaster account, you cannot follow this method. So learn how to verify your domain ownership to Google from this step by step tutorial)
#4. 02 Click on “Verification Details” link right of your custom URL.
#4. 03 At the top of page you can see how you attempted to verify your domain. Click on DNS CNAME record details to expand the record.
#4. 04 Now you would get a similar result like below. The portion of highlighted area is the “Host” part and the portion begins with “gv” is the “Point to” field. Save these details in a text document. You need them later in this tutorial.
Now you got the CNAME domain verification token key from Blogger. Let’s move to next step: mapping domain to work with Blogger.
#5. Log in to your Godaddy account manager.
#6. Click on “Launch” button next to Domains.
#7. Now you can see all your registered domains. Select the domain you want to add to Blogger and then click on the down-arrow button. Choose Manage DNS option from the menu list.
#8. You are in the Domain DNS zone. This is where you control the domain name, adding subdomains, linking to website hosts, etc. Now you want to verify your authority of domain name to Google.
Click on “Add Record” link in the Zone file section.
#9. Now you can see a pop out box titled “Add Zone Record”. Select record type as CNAME (Alias). Enter the values in the Host field and in the Point to field as shown below screenshot.
Note: You should copy and paste the values you received from Blogger in the 4th step. Don’t enter these values.
#10. Set TTL (Time To Live) as 1 hour. Then click on “Add Another” button. If you added the values correctly, you’d see a screen like below.
#11. Now you can close the pop up window. Don’t forget to save your changes.
#12. Now you have to point Google host to add www subdomain to your blog. Follow this step if you want include www in your domain. (Ex: www.priyadarshana.com) People who enter your blog URL as www.yourblogsite.com and try to view your blog will see a 404 page, if you don’t add www domain. So here’s how to add www part to your domain in Godaddy.
By default, Godaddy adds www subdomain pointing to the same host. So you just need to edit the Point to address. Here’s how to do it.
Click on Edit Record icon of www CNAME.
Remove “@” in the Point to field and enter ghs.google.com.
Host: www
Point to: ghs.google.com
Set TLL as 1 hour and click on finish button.
Don’t forget to save your changes.
#13. Now you verified your domain. But you didn’t point your domain to Google IPs. Here’s how to change the host IPs and set BlogSpot as the hosting provider in Godaddy.
#13. 01 Click on “Add Record” link.
#13.02 Select A (Host) Record from the record type list. Type @ to Host text field and in the Point to, enter this first Google IP: 216.239.32.21. Set TTL as one hour and then click on “Finish” button.
Now do the same thing for these three Google IPs and last save your changes in Godaddy Domain DNS zone.
216.239.34.21
216.239.36.21
216.239.38.21
After entering above four Google IPs, you’d see a screen like below.
#14. You don’t need the original host IP anymore. So you can delete it.
Step #3. Redirect BlogSpot to Domain
Now you configured custom domain at Godaddy for your BlogSpot blog. Remember it might take up to 48 hours to update the DNS zone. So wait a few hours and come back to your Blogger account.
For me, It took less than 5 minutes to map the custom domain to Blogger blog. If you followed the same process I explained above, you would also be able to set up the custom domain in less than 5 minutes.
Click on “Edit” link near to your custom domain in Blogger account and select the option that says to redirect your non-www domain to www domain.
Then click on “Save” button.
FAQ
Question: I have a fear, whether my search engine ranks will drop by moving to a custom domain. Can I get my lost positions again?
Blogger uses permanently redirect method which is also known as “301 redirect”. So 90% of link juice and authority will pass to your new domain. However, it’s not guaranteed that your previous search positions will come again in an overnight as you have a new domain. It’s good to move to a custom domain as fast as you can.
Question: Should I change my blog posts and page permalinks within blog posts?
No, Blogger uses permanent redirect to redirect the traffic to new domain. It will also redirect traffic coming from old URLs.
Question: My new URL only works with/without “www”
Go back to Blogger Publishing section and click the edit link near to your blog custom URL. Check the check box which asks you to redirect traffic from non www URL to www URL.
What to do Next:
Now you set up the custom domain for your BlogSpot blog. So Here are some important things to do for increasing the SEO performance of your blog.
- Submit your website to Search Engine: By submitting your website to search engines, Search engine bots will start crawling your website. So people can find your new domain on SERPs quickly.
- Submit New sitemap to Google webmaster tools: As you add custom domain to your BlogSpot blog, you need to submit a new sitemap to Google webmaster tools. Follow the steps in this blog post to learn how to submit a new sitemap to GWT.
- Add your domain to Bing and Yahoo: Bing and Yahoo are two search engines which can drive quality traffic to your website. Read this post and learn how to add your blog to Bing and Yahoo search engines.
- Setup Google Analytics for Blogger: If you didn't set up Google Analytics for your blog, follow the steps in this post to track visitor and user activities of your blog. If you already have set up Google Analytics for your blog, edit the website address in Google Analytics account. So you can get more accurate reports.
- Submit your website to Baidu and Yandex search engines: Although they are regional search engines, they can drive massive traffic than some social networks. Do you know that Baidu is one of the top 10 most popular websites in the world? So go ahead and follow the steps in these two blog posts to optimize your BlogSpot blog for Baidu and Yandex search engines. Meanwhile, you would follow these practical tips to increase your brand new domain’s Alexa rank quickly.
Conclusion
Using a top level domain name for your BlogSpot blog not only gives the unique and professional look, but also after a few weeks, you could start seeing massive increases of your overall traffic stats. It’s not only because you publish engaging content that people want to read and follow, but also because you have built up the authority and expertise in your industry that people remember you as the owner of yourdomain.com website.
People will start addressing your Brand on social media, online communities, online-conferences and also search your brand/website on Google. That way without your concern, your custom domain will take your online business to a few levels.
Hope this tutorial helped you set up the custom domain name for your BlogSpot blog. If you have anything to ask, share or complain, please use below comment form.

Hi! That is the finish of this post.As you add custom domain to your BlogSpot blog, you need to submit a new sitemap to Google webmaster tools.Automotive Domains
ReplyDeletegood post
ReplyDeleteAwesome post sir. This post is really very helpfull for new bloggers. You made it really easy to understand. Now we can set up our custom domain in blogger in just 5 minutes.
ReplyDeleteThank you.... 😀
.br domain registration Thanks for a very interesting blog. What else may I get that kind of info written in such a perfect approach? I’ve a undertaking that I am simply now operating on, and I have been at the look out for such info.
ReplyDelete